스프링(Spring)의 가장 큰 특징으로는 DI (Dependency Injection), IoC(Inversion of Control) 을 들 수 있다.
DI는 클래스의 생성 방식과 연관되어 있다. 클래스 안에는 필드가 있고, 프로그래머는 필드(Field)에 대해 클래스를 생성할 때 직접 생성할 것인지, 아니면 외부에서 이미 생성된 인스턴스(Instance)를 참조할 것인지 결정할 수 있다. 전자의 방식인 경우 만약 필드에 대한 클래스에 변경 사항이 생길 경우, 연쇄적으로 본 클래스를 변경할 여지가 있다. 그러나 DI 방식을 사용하면 이런 문제를 어느 정도 해결할 수 있다. 자바는 인터페이스(Interface)를 제공하여 같은 인터페이스를 이식(Implement)받은 클래스들을 모두 받아들일 수 있도록 한다.(부모 클래스를 변수의 type으로 지정하면 자식 클래스를 해당 변수에 받을 수 있는 원리와 유사하다) 인터페이스를 잘 사용하면 본 클래스에 대한 변경 없이 그 클래스만을 수정해도 전체 프로그램에는 영향을 주지 않게 할 수 있다.
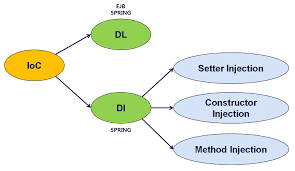
IoC는 스프링의 가장 중요한 기능 중 하나이면서 앞에서 설명한 DI와 큰 연관성이 있다. 앞서 클래스를 생성함에 있어서 우리는 DI 방식을 채택하기로 했는데 이 방식에는 한 가지 해결해야 할 문제가 있다. 우리가 클래스를 생성해야 하고 생성할 때는 인터페이스를 이식받은 클래스들 중 하나를 선택해 주어야 한다. 만약 파라미터로 받는 클래스의 종류가 달라지는 경우 어떻게 할 것인가? 매번 매개변수로 참조되는 클래스 종류가 변경될 때마다 참조 클래스 생성에 대한 코드를 다시 작성하는 것은 결합도를 높여 프로그램의 유지, 보수, 확장에 악영향을 준다. 그러면 이 것을 해결하기 위해서 어떻게 할 것인가? 방법은 간단하다. 우리는 미리 사용할 클래스들을 생성할 것이고, 생성할 클래스에 대해서는 XML 파일 등을 이용하여 하나로 모아 관리할 것이다. 특정 클래스에 대한 인스턴스가 필요한 경우, 우선적으로 컨테이너(Container)에 필요한 인스턴스가 있는지 확인할 것이고, 있다면 그 인스턴스를 사용할 것이다. 이 방식의 좋은 점은 사용자가 일일이 클래스를 생성해주는 작업을 하지 않아도 되고, 각 클래스 간의 관계를 파악하고 정리함에 있어서 유리하다는 것이다.
이제 실습을 통해서 알아보자. 일단 하나의 인터페이스(Entitiy)와 그 인터페이스를 이식받은 두 개의 클래스(EntityType1, EntityType2)를 만들어줄 것이다. 두 클래스는 유사한 부분이 있지만 상이한 메서드를 가지고 있는 것은 물론 오버라이드된 메서드도 서로 다른 기능을 하고있는 것을 알 수 있다.또한 인터페이스를 파라미터로 하는 출력 메서드를 가진 클래스 ConsolePrint를 만들어 줄 것이다. 코드는 다음과 같다.
package spring.entity;

public interface Entity {
    public String members();
}
package spring.entity;

public class EntityType1 implements Entity{

    private int korean;
    private int math;
    private int english;
    private int computer;

    public void setKorean(int korean) {
        this.korean = korean;
    }

    public void setMath(int math) {
        this.math = math;
    }

    public void setEnglish(int english) {
        this.english = english;
    }

    public void setComputer(int computer) {
        this.computer = computer;
    }

    public float avg(){
        return (korean+math+english+computer)/4;
    }

    @Override
    public String members() {
        return "korean : " + korean +", "
                +"math : " + math +", "
                +"english : " + english +", "
                +"computer : " + computer +","
                +"average : " + avg();
    }
}
package spring.entity;

public class EntityType2 implements Entity{

    private int korean;
    private int math;
    private int english;
    private int computer;
    private int music;

    public void setKorean(int korean) {
        this.korean = korean;
    }

    public void setMath(int math) {
        this.math = math;
    }

    public void setEnglish(int english) {
        this.english = english;
    }

    public void setComputer(int computer) {
        this.computer = computer;
    }

    public void setMusic(int music) {
        this.music = music;
    }

    public float sum(){
        return korean+math+english+computer+music;
    }

    @Override
    public String members() {
        return "korean : " + korean +", "
                +"math : " + math +", "
                +"english : " + english +", "
                +"computer : " + computer +","
                +"music : " + music +","
                +"sum : " + sum();
    }
}
package spring.service;

import spring.entity.Entity;

public class ConsolePrint {
    public void print(Entity entity){
        System.out.println(entity.members());
    }
}
package spring.main;

import spring.entity.Entity;
import spring.entity.EntityType1; //수정
import spring.entity.EntityType2; //수정
import spring.service.ConsolePrint;

public class Main {
    public static void main(String[] args){
        //Entity entity = new EntityType1();
        Entity entity = new EntityType2(); //수정
        ConsolePrint print = new ConsolePrint(); //잠재적인 수정
        print.print(entity);
    }
}
여기서 문제점은 첫 번째로 일일이 사용자가 참조 클래스를 생성해주어야 해서, 이와 관련하여 파생되는 변경 사항들이 우후죽순 발생한다는 것이다. 이제는 xml 파일을 만들고 Spring을 이용하여 미리 지정한 객체들을 생성하고 그 객체를 이용할 것이다. src 파일에 xml 파일을 다음과 같이 추가해주면 된다.
<?xml version="1.0" encoding="UTF-8"?>
<beans xmlns="http://www.springframework.org/schema/beans"
       xmlns:xsi="http://www.w3.org/2001/XMLSchema-instance"
       xsi:schemaLocation="http://www.springframework.org/schema/beans http://www.springframework.org/schema/beans/spring-beans.xsd">

    <bean id = "entity" class="spring.entity.EntityType1">
        <property name="korean" value="90"/>
        <property name="math" value="90"/>
        <property name="english" value="100"/>
        <property name="computer" value="100"/>
    </bean>

    <bean id = "console" class="spring.service.ConsolePrint"/>
</beans>
여기서 <bean> 태그는 미리 container에 생성해서 저장해 놓을 객체들에 대해서 정해놓은 것이다. 우리는 이 설정 파일을 이용하여 전체 객체들을 관리할 것이다. (추신!! 아마 처음 xml 파일을 선택하고 나면 spring configuration과 관련해서 메시지가 나올 것이다. Spring context를 추가해주자. 만약 Spring과 관련된 클래스들이 인식되지 않으면 인텔리제이를 기준으로 File -> Project Structure -> Module -> dependencies에서 스프링을 추가해주면 ContextApplication을 비롯한 클래스들이 인식될 것이다!!)
이런 식으로 설정해주면 Main 클래스는 다음과 같아질 것이다.
package spring.main;

import org.springframework.context.ApplicationContext;
import org.springframework.context.support.ClassPathXmlApplicationContext;
import spring.entity.Entity;
import spring.service.ConsolePrint;

public class Main {
    public static void main(String[] args){
        ApplicationContext context = new ClassPathXmlApplicationContext("setting.xml");

        Entity entity = (Entity) context.getBean("entity");
        ConsolePrint print = (ConsolePrint) context.getBean("console");

        print.print(entity);
    }
}
보다싶이 따로 인스턴스를 생성하지 않고 미리 생성한 것들을 가져다 쓰는 것을 알 수 있다. 만약 엔티티와 관련된 부분을 다른 클래스로 바꾸고 싶다면 다음과 같이 바꾸기만 하면 된다.
<?xml version="1.0" encoding="UTF-8"?>
<beans xmlns="http://www.springframework.org/schema/beans"
       xmlns:xsi="http://www.w3.org/2001/XMLSchema-instance"
       xsi:schemaLocation="http://www.springframework.org/schema/beans http://www.springframework.org/schema/beans/spring-beans.xsd">

    <bean id = "entity" class="spring.entity.EntityType2">
        <property name="korean" value="90"/>
        <property name="math" value="90"/>
        <property name="english" value="100"/>
        <property name="computer" value="100"/>
    </bean>

    <bean id = "console" class="spring.service.ConsolePrint"/>
</beans>
이처럼 Spring을 이용하면 개발을 하는데 큰 이점을 누릴 수 있다. XML을 이용하여 객체들을 관리하는 방법을 알고 싶다면 다음 블로그를 공유하겠다.
[Spring] 스프링 XML 설정 파일 작성 방법 정리
[Spring] 스프링 XML 설정 파일 작성 방법 정리 📄 목차 1. 스프링 XML 설정 파일 포맷 - 기본 포맷 - 애노테이션 설정을 사용하기 위한 포맷 2. 빈(Bean) 설정 예시 - 자동 주입 설정 - autowire 속성 3. DI(Dep
atoz-develop.tistory.com
아주 자세하게 나와있어서 어지간하면 이 글을 보면 XML을 작성하는데 큰 무리가 없을 것 같다. 요즘은 XML을 작성하는 것도 번거로워서 어노테이션을 다는 방식을 사용한다. 그러나 XML 파일을 이용하는 방법도 나름의 장점이 있고, 구버전의 경우 XML 파일을 사용하는 방식만 지원되기에 알아둘 필요가 있다. 이것으로 이번 글을 마치겠다.
'컴퓨터 과학 > Web' 카테고리의 다른 글
| 이클립스 쓰면서 발생한 문제들에 대한 간단한 tips (0) | 2023.04.21 |
|---|---|
| 2. 스프링 부트로 배우는 자바 웹 개발 : 자바 서블릿 (0) | 2023.02.14 |
| 1. 스프링 부트로 배우는 자바 웹 개발 : 개발 환경의 변화(웹 서비스 구조 등 간단한 설명) (0) | 2023.02.01 |
| 5. Spring/Spring Boot를 이용한 로그인 페이지 만들기 : 테스트 (0) | 2023.01.27 |
| 4. Spring/Spring Boot를 이용한 로그인 페이지 만들기 : 임시 저장소 및 서비스 구현, 테스트 (0) | 2023.01.27 |


